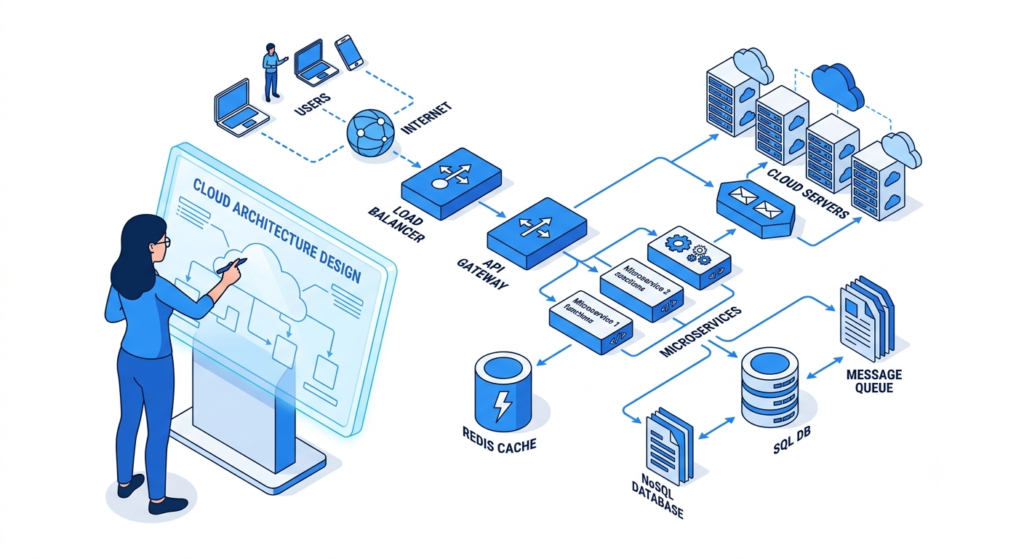
When a service in a microservices architecture becomes slow or unavailable, the services that depend on it can also start failing. Repeated requests, long waits, and exhausted resources can turn a small problem into a system-wide outage. This is known as a cascading failure.
The circuit breaker pattern in microservices helps prevent this situation by temporarily stopping requests to an unhealthy service. Instead of repeatedly calling a failing dependency, the application can fail fast, use fallback logic, and give the affected service time to recover.
In this guide, you’ll learn what the circuit breaker design pattern is, how its states work, and how to implement it in Java using Spring Boot and Resilience4j.
What Is the Circuit Breaker Pattern in Microservices?
The circuit breaker pattern is a design pattern used in distributed systems to prevent repeated calls to a service that is failing or responding too slowly.
Think of an electrical circuit breaker. When it detects a dangerous condition, it interrupts the flow of electricity. Similarly, a software circuit breaker monitors calls to a remote dependency and temporarily blocks requests when failures cross a configured threshold.
For example, imagine an e-commerce application with separate order, payment, and inventory services. If the payment service becomes unavailable, the order service may continue sending payment requests. Those requests can accumulate, consume threads, and increase pressure on the application.
A circuit breaker can detect repeated failures and stop sending requests temporarily. The application can return a controlled error or execute a fallback instead of waiting for every request to time out.
A circuit breaker does not repair the failing service or automatically route traffic to a healthy instance. Its primary role is to protect system resources, limit repeated unsuccessful calls, and support resilient microservices.
How Does the Circuit Breaker Pattern Work?
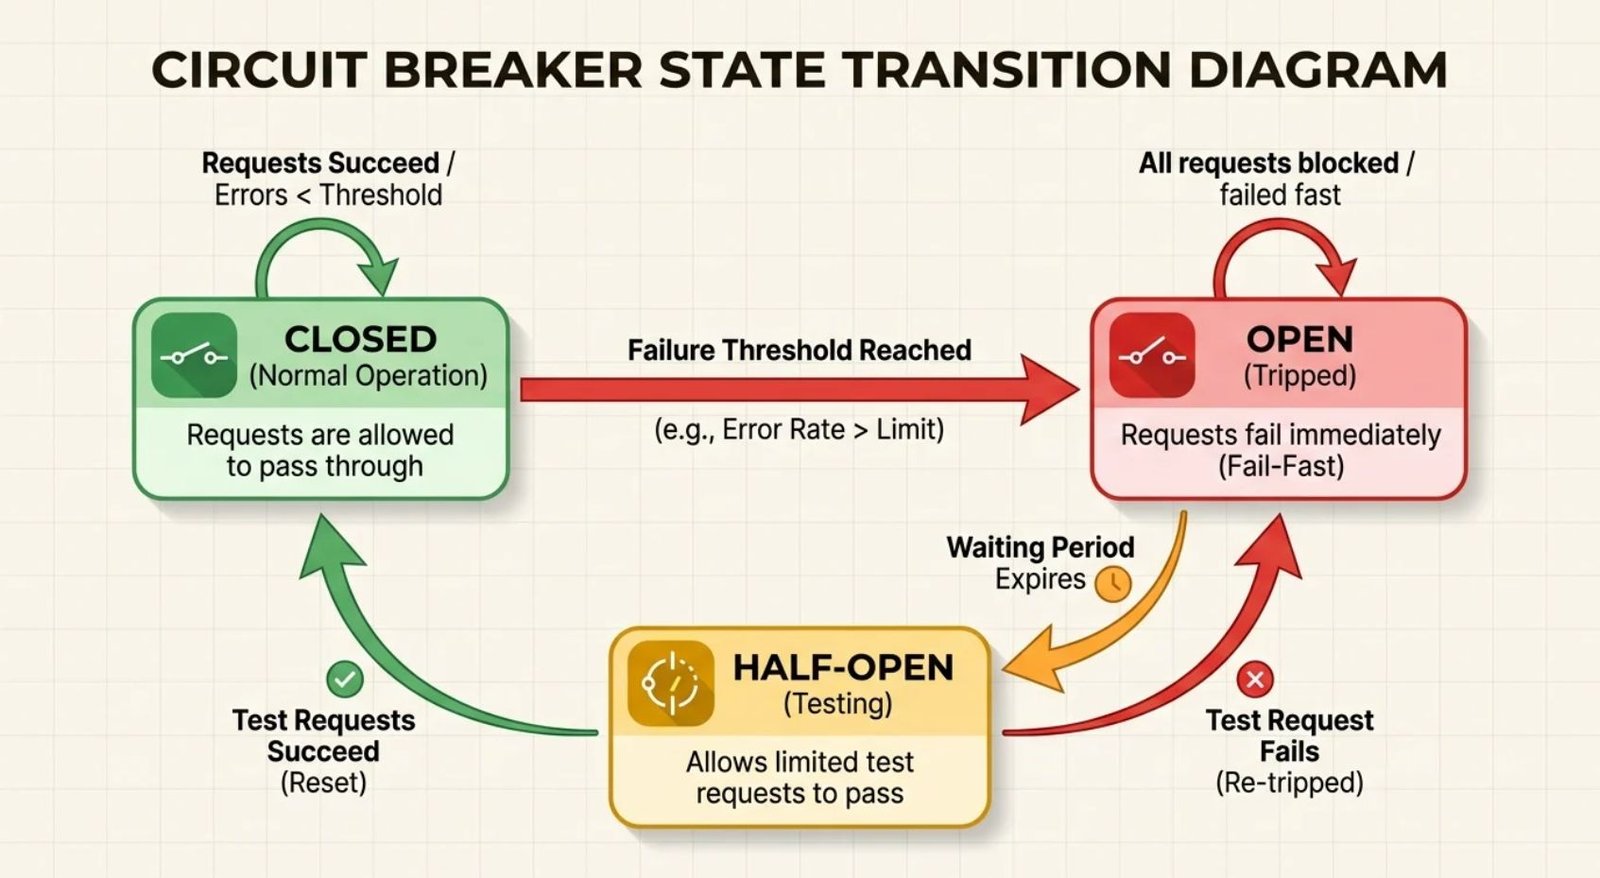
A typical circuit breaker has three states: Closed, Open, and Half-Open. The breaker changes states according to configured failure thresholds and recovery rules.
1. Closed State
In the Closed state, requests pass through to the downstream service normally. The circuit breaker records outcomes, such as successful calls, failed calls, and—in configurations that support it—slow calls.
If the measured failure rate exceeds the configured threshold after enough calls have been recorded, the breaker can transition to the Open state.
2. Open State
In the Open state, the circuit breaker rejects calls without attempting the protected remote operation. This behavior is known as failing fast.
The breaker remains open for a configured waiting period. During this time, the application may return a fallback response, display a temporary error, or use suitable cached data when doing so is safe.
3. Half-Open State
After the waiting period, the breaker can enter the Half-Open state. It allows a limited number of test requests to determine whether the downstream service has recovered.
If the test calls succeed according to the configured rules, the breaker returns to Closed. If failures continue, it returns to Open and blocks calls for another waiting period.
How to Implement the Circuit Breaker Pattern in Java with Spring Boot
Spring Boot simplifies the development of stand-alone Java applications and services. You can integrate Resilience4j, a fault-tolerance library that provides circuit breakers, retries, rate limiters, and bulkheads.
The example below uses the Resilience4j Spring Boot 3 integration. Keep your Spring Boot and Resilience4j versions compatible, and use the official documentation when selecting versions for your project.
Step 1: Create a Spring Boot Project
Open Spring Initializr and create a project with these settings:
- Project: Maven
- Language: Java
- Spring Boot: Choose a currently supported Spring Boot 3 version for this example.
- Dependencies: Spring Web and Spring Boot Actuator
Generate the project, extract the downloaded ZIP file, and open it in IntelliJ IDEA, Eclipse, or VS Code with Java support.
If you already have a Spring Boot project, you can use it instead.
Step 2: Add the Resilience4j Dependencies
In your Maven project’s pom.xml, add the following dependencies inside the <dependencies> section. The example pins Resilience4j to version 2.3.0; verify the current supported version and compatibility before publishing or using the code in production.
<properties>
    <resilience4j.version>2.3.0</resilience4j.version>
</properties>

<dependencies>
    <dependency>
        <groupId>io.github.resilience4j</groupId>
        <artifactId>resilience4j-spring-boot3</artifactId>
        <version>${resilience4j.version}</version>
    </dependency>

    <dependency>
        <groupId>org.springframework.boot</groupId>
        <artifactId>spring-boot-starter-actuator</artifactId>
    </dependency>

    <dependency>
        <groupId>org.springframework.boot</groupId>
        <artifactId>spring-boot-starter-aop</artifactId>
    </dependency>

    <dependency>
        <groupId>org.springframework.boot</groupId>
        <artifactId>spring-boot-starter-web</artifactId>
    </dependency>
</dependencies>
If your project already includes Spring Web, Actuator, or other dependencies, avoid adding duplicate entries. Spring Boot’s parent POM or dependency management should manage the Spring Boot dependency versions.
Step 3: Configure the Circuit Breaker
Create or update src/main/resources/application.yml:
resilience4j:
  circuitbreaker:
    instances:
      paymentService:
        slidingWindowType: COUNT_BASED
        slidingWindowSize: 10
        minimumNumberOfCalls: 5
        failureRateThreshold: 50
        waitDurationInOpenState: 10s
        permittedNumberOfCallsInHalfOpenState: 3
This configuration creates a circuit breaker named paymentService.
slidingWindowType: Evaluates a count-based window of calls.slidingWindowSize: Uses up to 10 calls in the configured window.minimumNumberOfCalls: Requires at least five recorded calls before evaluating the failure rate for a state transition.failureRateThreshold: Sets the failure threshold to 50%.waitDurationInOpenState: Keeps the breaker open for 10 seconds before it can attempt recovery.permittedNumberOfCallsInHalfOpenState: Allows three calls while checking whether the service has recovered.
These are example values, not universal production settings. Tune the circuit breaker configuration to match your service’s traffic, latency, and failure characteristics.
Step 4: Protect a Service Call
Create a PaymentClient.java class. The @CircuitBreaker annotation tells Resilience4j to protect the method call.
import io.github.resilience4j.circuitbreaker.annotation.CircuitBreaker;
import org.springframework.stereotype.Service;
import org.springframework.web.client.RestTemplate;

@Service
public class PaymentClient {

    private final RestTemplate restTemplate;

    public PaymentClient(RestTemplate restTemplate) {
        this.restTemplate = restTemplate;
    }

    @CircuitBreaker(
        name = "paymentService",
        fallbackMethod = "paymentFallback"
    )
    public String processPayment() {
        return restTemplate.getForObject(
            "http://localhost:8081/payments",
            String.class
        );
    }

    public String paymentFallback(Exception exception) {
        return "Payment service is temporarily unavailable.";
    }
}
The URL is an example endpoint. Replace it with the actual endpoint for your application.
Next, create AppConfig.java to register the RestTemplate bean:
import org.springframework.context.annotation.Bean;
import org.springframework.context.annotation.Configuration;
import org.springframework.web.client.RestTemplate;

@Configuration
public class AppConfig {

    @Bean
    public RestTemplate restTemplate() {
        return new RestTemplate();
    }
}
The fallback method must have a compatible return type and parameter signature. For this example, the protected method has no parameters, so the fallback accepts the exception as its only parameter.
The example uses a broad Exception parameter for simplicity. In production, handle failures deliberately and avoid hiding programming errors or unexpected conditions.
Important: A fallback message is not a successful payment. Your application must represent the payment outcome accurately and must not report an unconfirmed transaction as completed. For real payment systems, use appropriate transaction-status checks and idempotency controls.
The example also assumes the downstream payment service is running at the specified URL. If it is unavailable, the request may fail and trigger the fallback. A complete demonstration should test both successful and failing calls.
Step 5: Monitor Circuit Breaker Behavior
Monitoring helps you determine whether the breaker is protecting the application or opening too frequently.
Spring Boot Actuator provides operational endpoints, while Resilience4j can expose circuit breaker metrics and health information when configured with the required integrations.
Track indicators such as:
- Circuit breaker state transitions.
- Successful and failed calls.
- Slow-call and failure rates.
- Calls rejected while the breaker is open.
- Fallback frequency and downstream response times.
Secure operational endpoints and expose only the information your application actually needs. Do not publish sensitive management endpoints publicly without appropriate access controls.
Because repeated failures and slow requests can consume database connections and other resources, understanding database connection pooling and timeout configuration can help you build more reliable services.
For further implementation details, see the official Resilience4j documentation and Spring Cloud CircuitBreaker reference.
Circuit Breaker vs. Retry Pattern
The circuit breaker pattern and retry pattern both help applications handle failures, but they solve different problems.
| Feature | Circuit breaker | Retry pattern |
|---|---|---|
| Main purpose | Prevent repeated calls to an unhealthy dependency | Attempt a failed operation again |
| Typical behavior | Blocks calls while open | Repeats calls according to retry rules |
| Best suited for | Persistent failures and unhealthy dependencies | Temporary or transient failures |
| Main risk | Requests may be rejected while the breaker is open | Excessive retries can increase load |
| Common companion | Fallbacks and timeouts | Backoff, jitter, and idempotency |
A retry can be useful when a failure is temporary, such as a brief network interruption. A circuit breaker is more useful when a dependency is consistently failing or responding too slowly.
They can work together, but configure them carefully. Aggressive retries can amplify traffic and make an already struggling service worse. Use bounded retries, suitable timeouts, and backoff strategies. For operations that may be repeated, consider idempotency to prevent duplicate side effects.
A rate limiter complements a circuit breaker by controlling how many requests a service accepts, helping protect downstream systems from excessive traffic.
Circuit Breaker Best Practices
Follow these circuit breaker best practices to make the pattern useful in production:
- Configure realistic thresholds. Set failure rates, minimum call counts, and waiting periods based on actual service behavior rather than copying example values blindly.
- Set timeouts. A circuit breaker does not replace a connection or request timeout. Without timeouts, calls may remain blocked for too long.
- Design safe fallbacks. Return a clear temporary failure, use cached data only when appropriate, and never pretend that an unconfirmed transaction succeeded.
- Monitor state transitions. Measure failures, slow calls, rejected calls, and fallback activity to understand how the breaker behaves under real traffic.
- Avoid retry storms. Combine retries with backoff and sensible limits. Make sure retry policies do not overwhelm the downstream service.
- Test failure scenarios. Test timeouts, connection failures, repeated errors, recovery, and the behavior of the Half-Open state.
- Choose the right dependency boundary. Configure breakers around meaningful remote operations instead of creating unnecessary complexity around every method.
A circuit breaker is not a replacement for load balancing, rate limiting, or bulkheads. These are separate resilience patterns that can complement one another. For example, a bulkhead pattern isolates resources so one overloaded dependency does not consume every available thread or connection.
Frequently Asked Questions
What is the purpose of the circuit breaker pattern in microservices?
The purpose is to prevent repeated calls to a failing or slow dependency, reduce the risk of cascading failures, and give the service time to recover.
When should you use the circuit breaker pattern?
Use it when a service depends on a remote API, database-backed service, or other network dependency that can fail or become slow. It is especially useful when repeated requests can consume significant resources or affect other services.
How do you implement a circuit breaker pattern in Java?
You can implement it with a fault-tolerance library such as Resilience4j. In a Spring Boot application, add the integration dependency, configure the breaker, and protect a method with the @CircuitBreaker annotation and an appropriate fallback.
What is the difference between a circuit breaker and a retry?
A retry attempts an operation again after a failure. A circuit breaker temporarily blocks calls when failure conditions indicate that a dependency may be unhealthy. Use retries for suitable transient failures and circuit breakers to limit repeated calls to failing dependencies.
Conclusion
The circuit breaker pattern in microservices is an important technique for building resilient distributed systems. By managing the Closed, Open, and Half-Open states, an application can stop repeatedly calling an unhealthy dependency and reduce the impact of failures.
With Spring Boot and Resilience4j, you can configure a breaker, protect remote service calls, and implement fallback behavior without building the entire mechanism from scratch. Combine it with sensible timeouts, monitoring, carefully controlled retries, and realistic testing to improve application reliability.